Friday, April 27, 2012

Date Addiction

I will admit it. I have an addiction. I am in love with my Medjool date balls and there is nothing I can do to stop now. I may have even forced some other people to try them thus causing addiction issues for others. I am a troublemaker.

I know I have already posted about these date balls or bars as I sometimes like to make them, but I know you haven't tried them yet. I know they are the kind of thing you kind of have to taste to be convinced that you too need to get yourself some Medjool dates. That is why you might see me carrying around a little container of them begging people to taste my new flavor. I am a crazy lady and I have gone crazy inventing new flavors. I have now made seven different kinds. Have I convinced you yet???

The process begins the same no matter what flavor you choose to make. You need to start with almonds and Medjool dates.

I have used both raw almonds and dry roasted and it doesn't really seem to make a difference so whatever you can find is fine.

But you do need to use the Medjool dates. They are larger and sweeter and have a nice chewy texture. You will need exactly 12 of these dates to make the perfect consistency.

Cut them open and take out the pits. I like to cut each one into fourths to help the food processor along. COUNT YOUR PITS! Make sure you have 12 and throw them away. I have accidentally put one in the processor a few times. Trust me. You will know if this happens to you. Set the dates to the side.

Place one over flowing cup of almonds into the processor and turn it on for a few minutes. You want it to be ground pretty finely.

It should look like this with no big chunks. Pour the almonds into a separate container and put the dates into the processor.

You will want to process the dates until they form into a ball. It is one sticky big ball of dates! Then dump your almonds back in and get your other ingredients ready.

This is where the fun begins! Most of these date balls I have made have only 4-5 ingredients. I absolutely love that! It makes them a cinch to whip up and I feel good about how healthy they are. For the sake of this post I will pretend you are all making my latest version, Chocolate Cherry, but I will give you all the recipes!

You do need to use dried fruit. Regular fruit would have too much moisture and would also leave chunks of the peel which wouldn't roll up nicely or taste great. I added about 2/3 of a cup of these dried cherries. It can be a bit of a struggle to find dried fruit without added sugar. Do your best! The dates already have plenty of natural sugar and are super sweet. You don't need any added sugar. Pour the cherries into the processor.

Then add about 3 tbsp. of unsweetened cocoa powder. You can add a bit more if it isn't chocolaty enough for you.

Because the flavor of the cherries was a bit mild the flavor wasn't turning out like I had imagined it would. Almond extract can sometimes take on a cherry flavor so I added about 1/2 tsp. Don't go overboard with this. Start with the 1/2 tsp. and add more if you find it isn't enough for you. It is a strong flavor! This was the perfect addition. Process this mixture until it all comes together. Stop the processor and pick a bit out and try to roll it into a ball. If it comes together easily then you are done. If you find it isn't coming together easily then you may need to add a bit of milk or process a bit longer. I like to use almond milk but regular is fine too. I would definitely keep them in the fridge after that though. You probably won't need more than a tsp. of milk.


This is what your mixture should look like. Dump that out onto a piece of waxed paper and start rolling into balls. I usually get about 30-32 balls out of one batch.

This happens to be the lemon ginger flavor but this is an idea of the size for you. I would probably call them one inch balls or maybe just under an inch.


You can also flatten the mixture and use a rolling pin to get a nice even square and cut them into bite size squares. I like to do this if I am serving these more as a dessert then an energy ball or little pick me up. I do have to cut the uneven edges off when doing it this way and press those scraps into a new square until the mixture is all used up.Store them flat with parchment or waxed paper between layers if you do it this way.

This is how I like to store them. I do keep them in the fridge. I like them to firm up a bit and the date container says to store the dates in the fridge after opening. If you like them softer then take a few out at a time and leave them on the counter for a bit.

Miles and I have both loved having these around the house. They are perfect for before or after a workout or for that little something sweet to cleanse your palate after a meal. I also like them when I am just having a snack attack!

So now for all seven recipes! For the record this Chocolate Cherry is Miles' new favorite and he won't stop talking about it. Yes a man is in love with these too. My favorite is by far the Apple Cinnamon. This whole craze was inspired however by the lemon ginger that I found on a blog I read called The Edible Perspective.

Since each kind is made the exact same way I am only giving brief instructions below for each flavor. The process is pretty simple and hard to mess up. You can be sure that I will come up with some more flavors soon too so you might want to check back for a post publish update! I am thinking something with mango and vanilla could be next! I will also be experimenting with some different nuts soon too like pecans for a pecan pie tasting flavor!

One more thing, I get that container of dates at Sams for only $8.58 I believe. That is a steal of a deal. You can get these dates here in Willmar at the Potpourii Health food store next to Jakes for about $6.95 a pound or a smaller container at Cash Wise near the raspberries. They are pretty expensive at Cash Wise however.

Lemon Ginger Date Balls
1 over-flowing cup almonds
12 Medjool dates, pitted
1 Tbsp. fresh squeezed lemon juice
2 tsp. lemon zest
1/2 tsp ground ginger.

Grind almonds and dates separately in a food processor. Place them both back into the processor and add the rest of the ingredients. Process until it sticks together nicely, about 1-2 minutes. Rolls into balls or cut into squares or longer bars.


Lime Coconut Date Balls
1 over-flowing cup almonds
12 Medjool Dates, pitted
1 Tbsp. fresh squeezed lime juice
2 tsp. lime zest
1/3 cup unsweetened coconut flakes finely processed.

Grind almonds, dates, and coconut flakes separately in a food processor. Place all ingredients back into the processor and mix until it sticks together nicely. Roll into balls or flatten and cut into squares or bars.


Chocolate Orange/Coconut Date Balls
1 over-flowing cup of almonds
12 Medjool dates, pitted
1-2 Tbsp. fresh squeezed orange juice
2 tsp. orange zest
1/3 cup unsweetened coconut flakes finely processed (optional)
1/2 cup dark chocolate chips finely processed
1/4 cup unsweetened cocoa powder

Grind almonds, dates, coconut flakes, and chocolate chips separately. Place them all back into the food processor and add remaining ingredients. Process until mixture comes together. Then shape into balls. (This recipe does have more ingredients and sugar because of the chocolate chips. You can leave out both the chocolate chips and the coconut flakes. With the extra ingredients you may need more juice)

Apple Cinnamon Date Balls
1 over-flowing cup of almonds
12 Medjool dates, pitted
1/2 cup dried apples (no added sugar if possible)
1/2 -1 tsp. cinnamon
1 Tbsp. almond milk

Grind almonds and dates separately in the food processor. Place back into the processor with remaining ingredients and process until mixture comes together. Add more milk if too dry. Shape mixture into balls or bars.

Apricot Nutmeg Date Balls
1 over-flowing cup of almonds
12 Medjool dates, pitted
1/2 cup dried apricots (no sugar added if possible)
1/2 tsp. nutmeg
1 Tbsp. almond milk

Grind almonds and dates separately in the food processor. Place back into the processor and add remaining ingredients. Process until mixture sticks together nicely. Roll into balls or bars.

Lemon Blueberry Date Balls
1 over-flowing cup of almonds
12 Medojool dates, pitted
2/3 cup dried blueberries (hard to find without added sugar so choose lowest sugar possible)
1 Tbsp. fresh squeezed lemon juice
2 tsp. lemon zest

Grind almonds and dates separately in the food processor. Place back into the processor and add remaining ingredients. Process until mixture sticks together well and form into balls or bars.

Chocolate Cherry Date Balls
1 over-flowing cup of almonds
12 Medjool dates, pitted
1/2 cup dried cherries (no sugar added if possible)
1/4 cup unsweetened cocoa
1/2-1 tsp. almond extract
1 tsp. almond milk

Grind almonds and dates separately in the food processor. Place back into the processor and add remaining ingredients. Add more milk if necessary to come together. Process for 1-2 minutes until mixture comes together nicely. Roll into balls or form into squares or bars.


Wednesday, April 25, 2012

Bruschetta Quinoa Wrap with Avocado Dressing

It happened to me again. I had to think quick. Lunch was looming and Miles was coming home. I opened the fridge and spied the leftover avocado dressing from our pistachio chicken dinner the night before as well as those little sweet browned onions. I looked around the fridge some more. Ahhh...a container of bruschetta! One more glance and my eyes fell on the leftover quinoa from small group Sunday night. "I believe I have a plan now!" I said to myself.

Sunday night I made a delicious salad with my beautiful red quinoa and some regular quinoa mixed together. I cooked a little extra that night because I like to eat it in my yogurt so I was in luck. I dumped the leftover, which was probably about
1 1/2- 2 cups,  into a bowl and added about 1/3 of this container of bruschetta. I think maybe I did go back and add a bit more at one point.

I found this at Cash Wise near the deli section I believe. I love it mixed with quinoa! Very tasty and very quick to pull together a lovely lunch!


I also had a few leftover onions from dinner the night before but I needed to cook a few more. I just dice them tiny and cook them in a bit of olive oil until they are browned. They are so delicious!

Then I topped my whole wheat wrap with some spinach for more greenness, the bruschetta quinoa, avocado dressing, and the onions.

Fold the sides in and roll it up. It is okay if the dressing drips out because that is the best part! The dressing was also leftover from pistachio chicken night. It is actually a South Beach Diet recipe that is truly one of our favorites. If you haven't tried the pistachio chicken yet you must. Miles was so shocked I wasn't taking pictures of our dinner that night because he thought for sure that recipe was blog worthy. I promptly replied, "Already on the blog!"

A fresh fruit plate on the side for us to share. I do so love those Cara Cara oranges!

I loved this wrap so much! I think I work best under pressure! Give this dressing a try even if you don't have bruschetta. It is so simple to make and tastes great with those sweet little onions on just about any salad! Word to the wise, don't skip the lime juice! That helps keep the avocado from turning brown.

P.S. This post is for Kristy who says I haven't been blogging enough!!! I think she should make me this for lunch next Wednesday when I am at the office to clean now that I have blogged today just for her!

Avocado Dressing:

1 tsp. grated sweet white onion
1 large ripe avocado, pitted and peeled
3 tbsp. extra virgin olive oil
3 tbsp. fresh lime juice
1 tbsp. water
salt to taste

Puree the onion, avocado, oil, lime juice, dash of salt, and water in a blender or food processor. Taste and add more salt if desired.

Monday, April 23, 2012

Cleaned Up Mac-N-Cheese

First, I apologize for the lack of blogging this past week. Three little letters take over my life this time of year..........V-B-S! I am the director of Vacation Bible School at our church and I am busy with a million details as my friend and co-director Sarah and I try to put this thing together again! I do love it but it does create some stress in my life. I have been working on a few recipes though.

Secondly, I found a keeper! I stumbled upon this recipe while browsing through recipes on my favorite site cleaneating.com I was in need of a quick dinner recipe because like usual I waited until the last minute to decide what we would have for dinner. I knew this would be a bit different than the regular stuff but since I don't feed the kids the regular stuff anymore I figured they just might settle for this. In fact, I rarely make pasta so they were pretty excited when they came to the table.

So here you go!

I have no idea why I had whole grain pasta instead of whole wheat pasta. I must have grabbed the wrong box. It's really not that big of a deal but I actually prefer the whole wheat now so I always choose whole wheat. Anyway get your pasta cooking. You will need about 3 cups of pasta. Since the recipe actually asked for elbow macaroni and I didn't have any I used a little more than three cups I am guessing.

Start by sauteing one small yellow onion finely sliced in some olive oil and a little bit of buttery spread like Earth Balance.

Then be smart and add in some diced ham now instead of forgetting it like I did and saute a few minutes more. If you like mushrooms add those in now too and saute. No one in this house likes them so of course I left them out!

Then you will add about 1 tbsp. of flour. The recipe calls for brown rice flour but I didn't have that. I used spelt flour because it is a very fine and smooth flour which is probably why they asked for brown rice flour in the first place. If you don't have either of those then try using some cake flour. It is just one tablespoon, but you don't want it to get all clumpy. It needs to act as a binder.

Then add some salt and pepper and get your Dijon mustard ready.

You are now ready to add the first of two cups of milk and 1 tbsp of Dijon. Add them in stirring constantly.  I would normally go heavy on the Dijon but I wanted the kids to enjoy this and it was a new recipe so I stuck with just one. After tasting it, I concluded that I made the right decision.

Then add your second cup of milk gradually and let it thicken as it cooks a few more minutes. It won't get real thick but don't worry. The cheese is coming!

It is now time to remove it from the heat and add in your cup of cheese. I followed the recipe and used Swiss because I love it so and because it is a lower fat cheese. I was a little shy of one cup though so I had to add a bit of mozzarella. If you are aiming to please the kids then use a reduced fat cheddar for a more familiar taste.

Stir that until it is melted and thickened.

Mmmmm........cheesy goodness for sure!

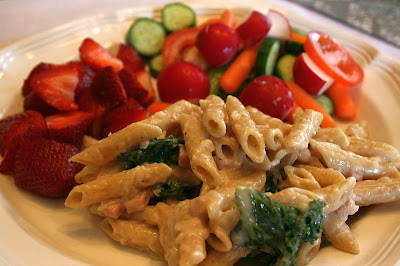
It looked a bit anemic for me though so I found something green to make it look more alive and to make me happier about serving this blandish looking food. I sauteed the kale first in a bit of olive oil to get it softened.

Stirred it in and what do you know. I was happy!

I quickly chopped up some strawberries and served a raw veggie salad. That certainly helped out with the whiteness of the main dish I would say!

I didn't actually tell the kids I was making Macaroni and Cheese so they just thought it was a random pasta dish. I think that worked in my favor. If I had said mac and cheese they would have expected something else for sure.
Evan absolutely loved this. He devoured it quickly, told his sister to hurry up and eat hers because it was really good, and then got up for seconds.
After Faith picked out all the ham she ate hers delightfully as well. I have no idea what that was about because she declares that ham is her favorite meat. I am chalking that up to her two X chromosomes!


Here is the recipe just as it appears on the clean eating sight but you should give that website a visit and find a few new things to try. I have loved everything I have made from there! 

Traditional Twist Mac & Cheese

INGREDIENTS:

  • 3 cups whole-grain elbow macaroni
  • 1 1/2 tsp olive oil
  • 1 1/2 tsp natural olive oil buttery spread (TRY: Earth Balance Natural Buttery Spread with Olive Oil) or organic unsalted  butter
  • 1 small yellow onion, finely sliced
  • 3 oz extra-lean, uncured, roasted ham, finely diced
  • 2 oz cremini mushrooms, sliced
  • 1 tbsp brown-rice flour
  • 1/4 tsp each sea salt and fresh ground black pepper
  • 1 tbsp Dijon mustard
  • 2 cups 1% milk, divided
  • 1 cup grated low-fat Swiss cheese
  • Fresh micro herbs for garnish, optional

INSTRUCTIONS:

  1. Bring a large pot of water to a boil on high. Add macaroni and cook according to package directions. Drain and return macaroni to pot, covering to keep warm.
  2. Meanwhile, in a large saucepan, heat oil and buttery spread on medium-high. Add onion and sauté, stirring occasionally, until soft and translucent, 2 to 3 minutes. Add ham and sauté, stirring occasionally, for 2 minutes. Add mushrooms and sauté until browned, about 4 minutes. Sprinkle with flour, salt and pepper and cook for 1 minute, stirring constantly. Add Dijon and 1 cup milk, stirring constantly. Gradually add remaining milk, stirring after each addition. Continue cooking until slightly thickened, 1 to 2 minutes. Remove from heat and add cheese, stirring until completely melted. Add macaroni and stir until well combined. If desired, garnish with herbs and serve.

Tuesday, April 17, 2012

Baked Apple Pear Oatmeal

Do you ever have a night where all that sounds good for dinner is breakfast? That happened to me Sunday evening. We weren't all that hungry that night, the kids were eating leftovers, and I just wanted a little something like a bowl of cereal. That happens to me occasionally too. But this time I wanted it to be warm so I was going to make some oatmeal on the stove. But then I had an inclination to create something better and this baked apple-pear oatmeal was born!

This is very simple so you will be really happy!!! I remarked to my husband who ate two bowls of this that it was so simple even he could make it.

Into the bowl went rolled oats, organic raisins, sucanat, cinnamon, and a dash of salt.


Then I added 4 cups of milk. I know it sounds like a lot but it will get mostly absorbed. I used 2 cups almond milk and 2 cups skim milk just because I like the vanilla flavored almond milk so much.

I was thinking of using just apples and when I was looking for a basic recipe to start with some suggested you could use pears so since I had the best of both worlds I chopped up my two apple-pears leaving the skin on and tossed them in the bowl.

Give that all a gentle but thorough stir.

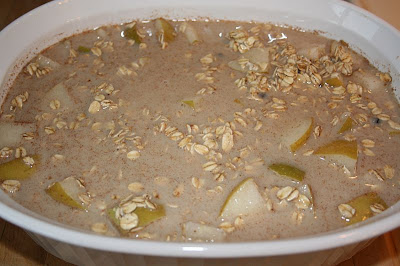
Pour it into a two quart casserole dish. It will look very soupy like this but I promise it will turn out fine. You do want a little moisture left in there anyway. 

See! After I gave it a stir it was the perfect consistency. Other recipes said to bake for 40 minutes but I ended up needing 50 minutes to absorb some more milk. It is my oven. I am sure the temperature is off so begin checking yours at 40 minutes.

I topped my portion with some sliced almonds for a bit more crunch and a drizzle of agave but it was plenty sweet on its own and next time I won't use the agave. If you like it a little soupier then spoon some of the left over milk in the bottom off the casserole in with your bowl. I was so happy that the apple-pear kept a firm texture. I wasn't looking for mushy fruit! It was so delicious and I am sure there are other combinations you could do. If you don't have an apple-pear just use one or the other or mix both!

If you want to hunt down these delicious little portions of goodness they come dressed in these funny little protectors. Even though I purchased those first ones at Trader Joes a while back, I have since found them at Sams and at Wal-mart!
I am thinking this might show up at our house again on Saturday morning for breakfast! I am sure the kids would love it and it is nutritious and filling!

Two thumbs up for delicious and simple!

Baked Apple Pear Oatmeal

2  2/3 cups old-fashioned oats
½  cup organic raisins
1/3  cup Sucanat (or packed brown sugar)
1 teaspoon ground cinnamon
1/4 teaspoon salt
2 cups fat-free milk
2 cups lite vanilla almond milk
2 medium apples or pears, chopped (I used an apple-pear)
½  cup chopped walnuts or sliced almonds
        Additional milk, if desired

Directions: Heat oven to 350 degrees. Mix oats, raisins, sucanat, cinnamon, salt, almond milk, regular milk, and apples or pears in a large bowl. Pour into a 2-quart casserole. Bake uncovered for 40-45 minutes or until most of the liquid is absorbed. Top with walnuts or almonds and additional milk if desired.

Notes: You can use all regular milk if you do not care for almond milk.


Sunday, April 15, 2012

Asian Stir Fry Night

I am not much of an Chinese food lover. I will never choose it, and I only eat at Chinese restaurants out of kindness if a friend picks it. I don't hate it, but if I am paying money for it I certainly won't choose it. I have a few other issues with Chinese food and the main one is these three letters M-S-G! Someone else in my family likes it though so I cooked it one night last week. I should learn to like it more because it does involve a heck of a lot of veggies!

This was one of those nights that I decided about 4:50 what we would have for dinner. That is probably when most of you decide, but we eat around 5:15-5:30 every night so that wasn't such a great thing.

I opened the freezer and found the stir fry veggies and decided to cook some chicken quick to throw in it and that was about all I was going to make. I cut the chicken into slices and cooked it in a little water and garlic. Then I set the chicken aside and quick rinsed out my pan. I only like to dirty up one pan.

Then I used a little Asian Stir Fry oil and a dash of fish sauce for cooking the veggies. Be careful with the fish sauce. It can be a bit salty and strong tasting.

This was the bag of veggies I had grabbed at Wal-Mart. I loved it! I will buy it again and make some kind of garlic sauce for it next time.

Into the pan and cooked until no longer frozen.

Add the chicken back to the pan.

  
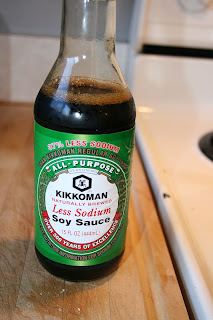
Then I also added a bit of low sodium soy sauce and some Chinese Five Spice. You know by now that I don't measure so I am guessing it was about a teaspoon of spice and a tablespoon or so of soy sauce. 

That was going to be all I served because I didn't really have any other plan. I figured I could just cut up some pineapple and call it good. However my daughter hates meat and even though I have worked really hard and she would eat the vegetables she wasn't going to be super thrilled about them. Plus pineapple is really bad for her reflux. That leaves her with about 3 bites of dinner. So I went scrounging in the fridge.


I found some won ton wrappers and some reduced fat cream cheese. Not super healthy but better than restaurant or store bought cream cheese won tons. I mixed in a bit of garlic powder and some green onions and a bit of soy sauce.

Folded those little suckers up with some water to make them stick together and....

pan fried them in some olive oil. I know you can see the lack of color in these little critters and know right away they aren't the best choice for you. You know my rules about color. What makes them doable and an occasional splurge is that the won ton wrappers are made with whole wheat flour and I used reduced fat cream cheese. It was less than a tablespoon of cream cheese in each won ton. The fact that we also used the asian stir fry oil to fry them helps a little since it is a pretty good oil to use but you can go one step better and skip the frying all together and boil them. Each won ton wrapper has about 20 calories so that doesn't make them to horrible. Just a guess but I think the 3 that I ate probably equaled around 125 calories.

125 calories for the won tons was worth it and after I also found some snap peas at the bottom of the crisper and cut up the pineapple it turned out to be a pretty good meal for deciding at 4:50 in the afternoon. We sat down by 5:30. Not too bad I'd say. Plus there is enough color on the plate to balance out the won tons.

Evan LOVED the won tons. That kid likes to save the thing he likes most for the end of his meal. He eats in a specific thought out order. (Proof that he is my kid!) So his chicken and veggies went down first, then the snap peas, then the pineapple, and he savored every bite of his won tons. He was so full he didn't think he could eat another bite and he offered me his last one. I said no thank you and that if he didn't want it I would probably just throw it away because it would soggy tomorrow. He was having NONE of that so he said, "I might as well!" and down the hatch it went. I am afraid for the teenage years and the grocery bill with a boy! It is already terrible so I am not even kidding. I am afraid.

In a couple years when I come knocking on your door asking if I can clean your house in return for some grocery money please take pity on me!

Asian Stir Fry
3-4 chicken breasts cut up and cooked in garlic and water
1 bag frozen stir fry veggies
1/2 -1 tsp. fish sauce
1-2 Tbsp. Asian stir fry sauce
1 tsp. Chinese five spice
1-2 Tbsp. reduced sodium soy sauce

Cook chicken and drain. Set aside. Add oil and fish sauce to the pan and add in the whole bag of the stir fry veggies. Cook until no longer frozen. Place the chicken back in the pan and add the soy sauce and five spice. Cook until warmed through 5-7 minutes. Serve immediately or keep warm on low until ready to serve.

Cream Cheese Won Tons
4 oz. reduced fat cream cheese
3 green onions chopped finely
1 tsp. soy sauce (or more to taste)
1 tsp. garlic powder (or more to taste)
1 package won ton wrappers
Asian stir fry oil or olive oil

Soften cream cheese and mix with green onion, soy sauce, and garlic powder. Brush edges of won ton wrapper with water. Place a scant tablespoon in the center of won ton wrapper and fold into a triangle. Press edges together firmly. Grab the left and right points and bring them down pinching together tightly. Place in heated oil in a pan and fry a couple minutes on each side.